Header/Social Media Icons

Navigation Bar

Sunday, August 30, 2015

Extreme Classroom Makeover- The Walls!

     It's crazy how fast the summer flies by! Especially when you are trying to get your classroom all set up and ready to go for your new students.  Setting up a classroom can be a lot of work! As teachers, we spend so much of your time in our classroom that it's great to add a personal touch to make your room your very own.  Adding your own style can really help set up the right environment to make a successful year.
     So if you don't absolutely love something in your classroom then why not change it, right? This summer we did an EXTREME classroom makeover.  We painted cupboards, tables, storage containers, easels, anything you can think of we probably painted it to give it a new fresh look. You can check out our other blog posts to read about the other paint adventures we did.  With lots of paint and man hours you can completely transform any area!  So let's talk about those lovely school walls!
     In our classrooms we have cinder block (our school is pretty old). There are layers after layers of paint on these walls. At some point, which can be seen where the paint chipped and the under colors show through, we had green walls, blue walls, maybe even yellow walls?  Then we ended with some form of a tan.  It was not a color that went with either classrooms decor.  
     WARNING! If you do not have at least a week to paint the walls or a lot of extra helpers save this project for another summer!  We spent about a full week of painting with both classrooms.  
     The first step is to find out what color paint you want.  Home Depot created a really cool app that can be used with your iPhone and the camera.  You can choose from different color swatches of paint and see what it would look like on an entire wall!  The app is called Project Color and can be found in the App Store.  
     We chose to buy the cheapest paint since it was going onto cinder block and we are teachers! 
     This particular brand was at Home Depot.  Emily tinted hers a grayish white to paint on all 3 walls, as well as, a gray gallon for an accent on the 4th wall.  Kassidy did a vibrant white on all 4 walls with pops of turquoise as the accent color.  It took a gallon of paint per wall.
     Now it is time to get the supplies! Be prepared to buy lots of roller brush pads!  We went through a lot because it was easier to do that then rinse them out and make a mess all over our new counter tops and sink.  
 
     A small paint brush will be needed to do the edge work.  
     The most time consuming part of the project was taping off!! We used Blue Painters tape. We taped EVERYTHING off! Such as: white boards, base boards, ceiling, cupboards, light switches, electrical outlets, etc.  It was a lot of taping that's for sure!
  Once all the taping is done you are ready to paint! 
   Funny story moment! After we finished taping and started painting in our rooms we found this tiny hole in Kassidy's classroom above where her desk normally goes.
     We have been saying to our Principal for years we would like to take down the wall in between our classrooms and put in one of those folding walls.  Oh my goodness it went ALL the way through to Emily's.  It's a start! 
     No that eyeball in the hole is NOT photoshopped! It is Kassidy's eye! We sure had a good laugh.
    Now back to painting... Like we previously said this project takes a lot of time!  We did two coats of paint on all the walls.  But once we were finished it was such a great feeling.  A simple new coat of paint can really give a new fresh feel to your classroom!
     Here is a sneak peak of the almost finished rooms!  They are starting to really come together!
     Emily's room with the new white wall.  
   Emily's gray accent wall. 
     Kassidy's front wall painted white.

Thanks for visiting! Keep checking back for more upcoming projects and our finished classrooms!

-Kassidy and Emily


Sunday, August 2, 2015

Chalkboard Tabletops!

We have been SO excited to share our favorite Classroom Makeover project that we've done this year!...Our CHALKBOARD TABLETOPS! We started out with all of our tables being a boring wood color like this:


These are the supplies we used:


We first primed all of our tables. (We had our primer tinted to a dark gray, and did two coats to ensure full coverage.) It dried pretty quick! We put one coat of primer on all of the tables (about 8) in one of our rooms, and then did the same in the other room. By the time we got back to the tables in the first room, they were ready for the second coat!

After the second coat was dry, we applied the first coat of Chalkboard Paint. It goes on pretty thin at first, so we ended up doing 3 coats of the chalkboard paint on each table. Just like we did for the primer, after we applied one coat to all of the tables in one room, we would go to the next room and do the same. We went back and forth between rooms to apply the next coat. For 8 tables, we used about a can and a half of the chalkboard paint all together. (It is about $10 a can at Lowes.) Great deal huh?! Another nice thing about painting these table tops was that we didn't have to do any dreaded prep work like taping! Here are what our tables looked like with 3 coats of chalkboard paint applied:

We wanted to add our own personal touch to add some color and cuteness to our tables that coordinated with our rooms, so we did this:


Emily used bright colored Duct Tape around the edges of her tables. She got the duct tape at a variety of stores including Walmart, Michael's Arts and Crafts, and Lowes. They turned out super cute huh? Note: Duct Tape Brand is the ONLY tape that will stick to the tables!


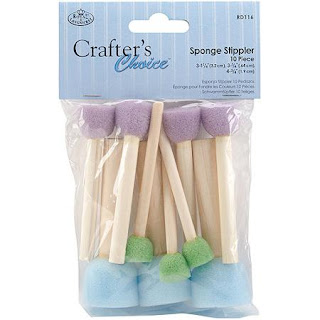
Kassidy used this acrylic paint in the color "Ocean Breeze" for the dots around the horseshoe tables, and a white acrylic paint in the same brand for the student tables. She used a round sponge brush to apply the dots. (She used the largest size sponge in the pack). The paint is from Michael's Arts and Crafts, and the sponges are from Walmart.

 
Our chalkboard tables are by far our FAVORITE project we have done this summer! We are really happy with how they turned out, and we think the students will have SO MUCH FUN writing on them this year! We will be sure to post our students doing activities with our new chalkboard tables this year. You can use them for practically anything...a quick quiz, handwriting practice, as a reward, you name it! We just LOVE projects that are simple, functional, and of course cute! This project fits into all of these categories!

 If you have any questions, please don't hesitate to comment below or email us at keclassworks@gmail.com. We'd be happy to help in any way!

Thanks for visiting! Keep checking back for more upcoming projects!

-Kassidy and Emily